运维过程中,我们往往需要将云服务器的资源同步到本地,如何实现呢?
首先进行windows服务器文件同步到centos中
一、windows同步到centos
服务器端:windows 192.168.11.117
客户端终端:centos 192.168.1.219
需求:centos 根据定时任务运行脚本 自动同步 服务器端 winserver 的数据
1.1 windows下载安装cwRsyncServer
下载地址:https://www.backupassist.com/rsync/


Service account:winsync Type password:winsync@123

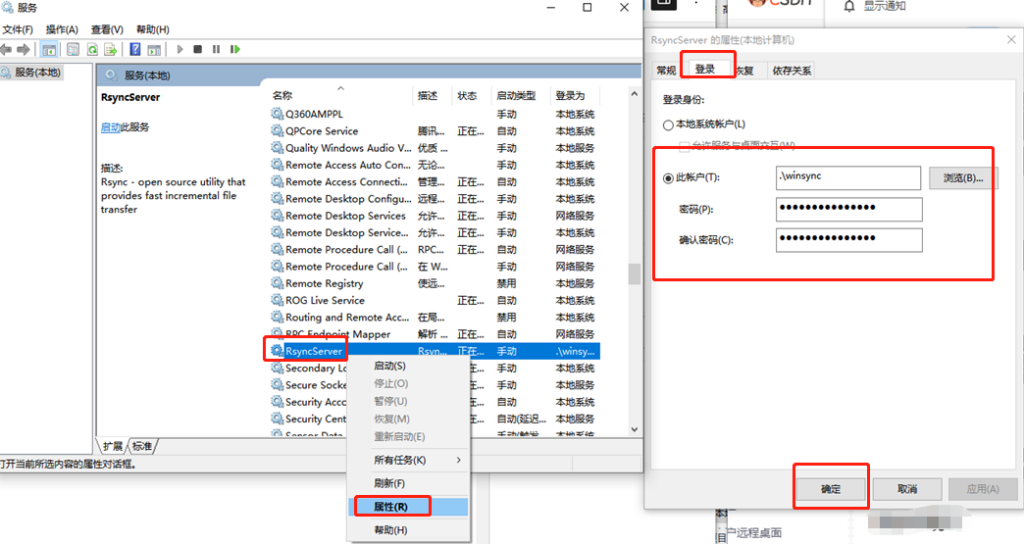
安装完成后,会自动创建一个 winsync的系统账户**后续的服务启用账号和文件权限都使用到。请注意
1.2 windows编辑配置文件
C:\Program Files (x86)\ICW\rsyncd.conf
UID = 0
GID = 0
use chroot = false
strict modes = false
read only = false
transfer logging = yes
#exclude=  ##忽略同步的文件
log file = rsyncd.log

[rsyncfile]
path = /cygdrive/e/rsyncfile/
###注意:E:\rsyncfile = /cygdrive/e/rsyncfile/
auth users = winsync
secrets file = etc/rsyncd.secrets
#hosts allow = 192.168.1.0/255.255.255.0  #IP段请自行修改
hosts deny = *
list = false
创建同步账号密码rsyncd.secrets
##C:\Program Files (x86)\ICW\etc 创建文件rsyncd.secrets
内容是:
winsync:winsync@123
1.3 windows创建同步的目录
根据rsyncd.conf的配置文件,我们本次同步的是E:\rsyncfile
因此在E盘创建好目录
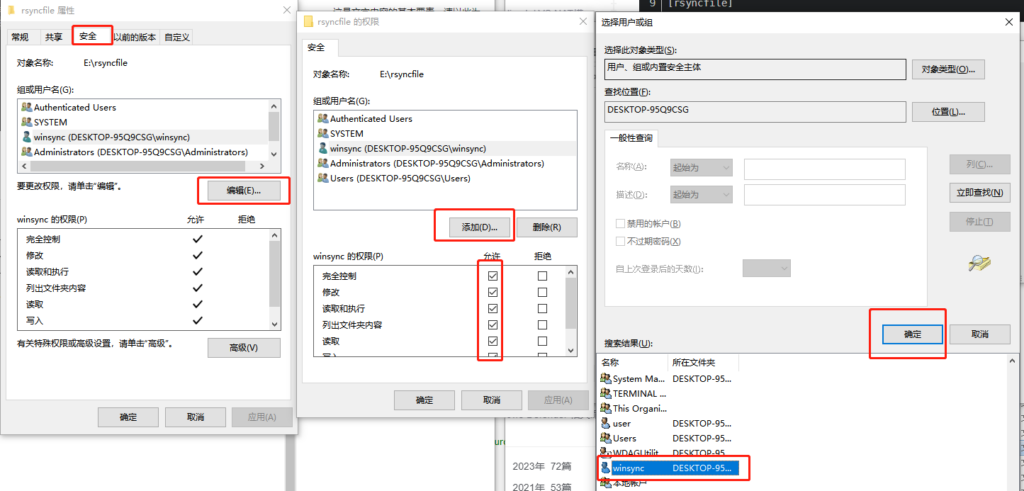
创建后切记增加权限。点击文件,右键属性,选择安全

1.4、windows启用服务
该账号在安装程序的时候自动创建的

然后右键启动。
1.5 centos检测是否正常
在centos中telnetwindows端的873端口

如果最后出现@RSYNCD: 30.0即为windows成功部署
1.6 centos安装rsync
shell>yum install -y rsync
shell>systemctl start rsyncd    #启动
shell>systemctl enable rsyncd   #增加开机启动
1.7 客户端 创建同步目录
shell>mkdir -p /data/backup1.8 创建密码表
shell>echo "winsync@123" > /root/passwd    #同步时免密码
shell>chmod 600 /root/passwd          #修改权限
1.9 手动执行同步
[root@master backup]# rsync -avz --password-file=/data/logs/passwd winsync@192.168.11.117::rsyncfile /data/backup
receiving incremental file list
./
111/
test/
test/aa.txt
test/ad.docx
test/bbb.txt
test/~$ad.docx

sent 149 bytes  received 9,338 bytes  18,974.00 bytes/sec
total size is 10,259  speedup is 1.08
1.10创建同步脚本
创建脚本并定时:
#!/bin/bash

# 定义变量
SOURCE="rsync://XinyeDBSync@hostIP:18730/oaback"  # 远程源
DEST="/nas_dir/backup/oa"  # 本地目标目录
PASSWORD_FILE="/nas_dir/backup/oa/passwd"  # 密码文件

# 获取当前年月日
YEAR=$(date +%Y)
MONTH=$(date +%m)
DAY=$(date +%d)

# 构建要同步的文件名模式
FILENAME_PATTERN="*${YEAR}_${MONTH}_${DAY}*.bak"
echo "================================"
echo "$(date +"%Y-%m-%d %H:%M:%S") OA数据库备份工作启动"
# 使用 rsync 同步符合条件的 .bak 文件
rsync -avzP --password-file="$PASSWORD_FILE" \
    --include="*/" \
    --include="$FILENAME_PATTERN" \
    --exclude='*' \
    "$SOURCE/" "$DEST/"

# 输出完成信息
echo "$(date +"%Y-%m-%d %H:%M:%S") 同步符合条件的 .bak 文件完成。"


TARGET_DIR="/nas_dir/backup/oa"

find "$TARGET_DIR" -type f -name "*.bak" -mtime +3 -exec rm -f {} \;

echo "删除非最近3天 .bak 文件工作完成。"
echo "================================="
1.11设置定时
二、centos同步到windows
2.1 centos安装rsync
shell>yum install -y rsync
shell>systemctl start rsyncd    #启动
shell>systemctl enable rsyncd   #增加开机启动
2.2 windows安装cwsync
在安装目录下面新建同步的文件夹 rsync_data,和一个密码文件 passwd.txt,内容为 服务器端的密码:winsync@123

2.3 创建自动执行的bat文件
@echo off

cd D:\winsync\bin

rsync.exe -avz rsync@192.168.1.113::image /cygdrive/d/winsync/rsync_data < d:\winsync\passwd.txt

::强制同步
::rsync.exe -avzP --delete rsync@192.168.1.113::image /cygdrive/d/winsync/rsync_data < d:\winsync\passwd.txt

pause
右键执行文件
3、inotify文件监听
参考地址:https://blog.csdn.net/m0_60758951/article/details/137879396
Linux 的 inotify 是一个监视文件系统事件的内核子系统。它允许应用程序监控文件系统变化,比如文件的创建、删除、修改、属性更改等。inotify 在多种应用中非常有用,比如自动备份、同步、文件索引和安全监控系统等。
3.1安装inotify-tools工具
shell>sudo apt update
shell>sudo apt install inotify-tools
3.2文件监听测试
在centos启动文件监听
[root@master logs]# inotifywait -mrq -e modify,delete,create /data/backup在centos启用文件同步
shell>rsync -avz --password-file=/data/logs/passwd winsync@192.168.11.117::rsyncfile /data/backup
3.3 创建监听脚本文件变化
创建一个rsyncwarn.sh的文件
#!/bin/bash

SOURCE_DIR="/data/backup"
LOG_FILE="/data/logs/file.log"

inotifywait -mrq -e modify,delete,create  "$SOURCE_DIR" --format '%e %w%f' |
while read events; do
    echo "$(date '+%F %T') 出现事件 $events"  >> "$LOG_FILE"
done
shell>chmod +x rsyncwarn.sh
####后台执行
shell>nohup ./rsyncwarn.sh &如何删除监听?
[root@master logs]# ps -aux |grep inotifywait
root     26039  0.0  0.0   6524   684 pts/0    S    11:05   0:00 inotifywait -mrq -e modify,delete,create /data/backup --format %e %w%f
root     26317  0.0  0.0 112812   980 pts/0    S+   11:06   0:00 grep --color=auto inotifywait
shell>kill 9 26039
四、centos同步到centos
RSYNC @ERROR: AUTH FAILED ON MODULE XXX 解决思路及附录RSYNC常见问题及解决办法 – faithfu – 博客园
